
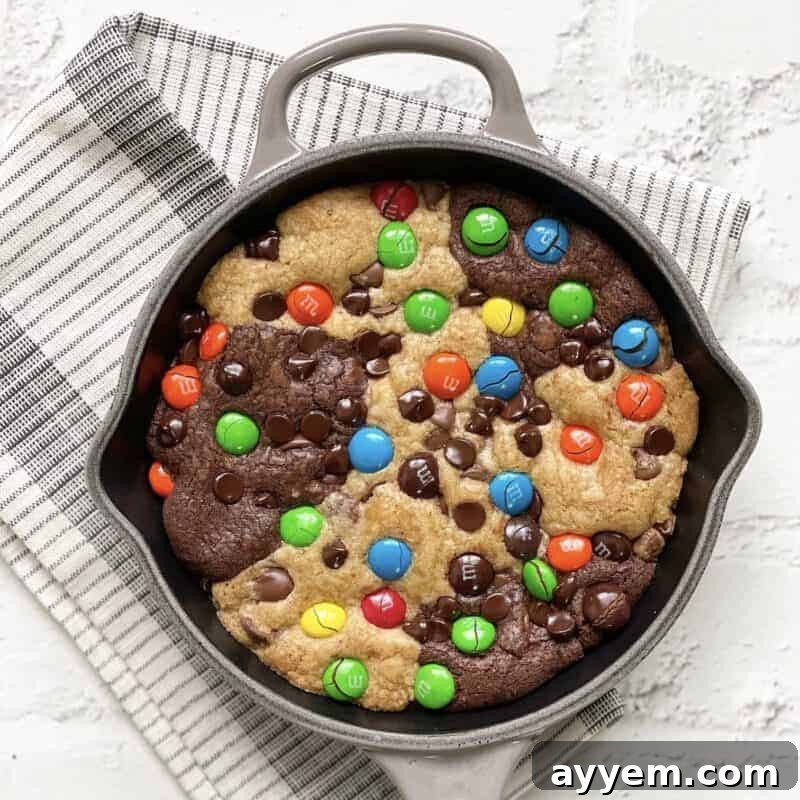
Welcome to the delightful world of skillet desserts, where simplicity meets decadence! Today, we’re diving into a truly heavenly creation: the Easy M&M Skillet Brookie. This irresistible dessert masterfully combines the fudgy richness of a classic brownie with the chewy perfection of a chocolate chip cookie, all baked to golden-brown splendor in a single skillet. Topped with a generous scattering of colorful M&M’s, this brookie isn’t just a treat for your taste buds; it’s a feast for the eyes too. Whether you’re a seasoned baker or just starting your culinary journey, this recipe offers a straightforward path to a show-stopping dessert that’s guaranteed to satisfy even the most intense sweet cravings with minimal fuss and maximum flavor.
What Exactly Is a Brookie? The Best of Both Worlds
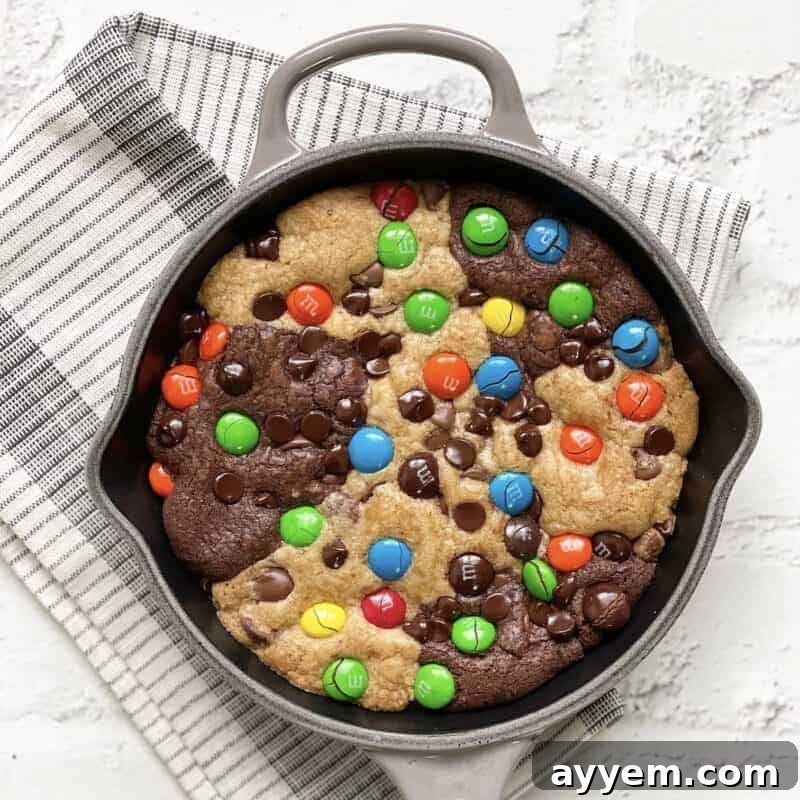
The term “brookie” is a playful portmanteau, aptly describing a dessert that ingeniously fuses two beloved baked goods: the brownie and the cookie. Typically, a brookie features a dense, fudgy brownie base layered with a soft, chewy chocolate chip cookie dough topping. This combination is then baked until both layers achieve their ideal texture – a moist, chocolatey bottom and a slightly crisp, golden-edged top that carries all the comforting notes of a homemade cookie.
The magic of a brookie lies in its dual personality, offering a textural and flavor experience that single desserts simply can’t match. You get the deep, rich cocoa notes and gooey center of a brownie alongside the buttery, vanilla-infused chewiness and chocolate chip bursts of a cookie. It’s truly a dessert that offers the best of both worlds, making it a universal crowd-pleaser.
While the concept might seem intuitive, the brookie as we know it gained significant popularity thanks to innovators like Jovon English, often credited with its original creation. Since then, the brookie has evolved into countless delightful variations, moving beyond traditional squares to encompass an array of shapes, sizes, and flavor profiles. From sophisticated brown butter brookie cookies that elevate the classic, to convenient sheet pan brookie recipes perfect for feeding a crowd, and even playful easy s’mores brookie bars that bring a campfire favorite indoors, the brookie constantly reinvents itself, proving its versatility and enduring appeal in the dessert world. Our M&M Skillet Brookie stands as a vibrant testament to this delicious evolution.
Why Choose a Skillet Brookie? Advantages of Pan Baking
Opting for a skillet to bake your brookie isn’t just a stylistic choice; it comes with several practical benefits that enhance the dessert experience. Skillet baking, particularly in cast iron, provides unique advantages that make it an excellent vessel for a rich, layered treat like a brookie. Firstly, cast iron skillets offer superior heat retention and distribution. This means your brookie bakes evenly from edge to center, resulting in that coveted fudgy interior and perfectly crispy edges that are so desirable in both brownies and cookies.
Secondly, the rustic charm of serving a dessert directly from a warm skillet is undeniable. It creates a cozy, inviting atmosphere, perfect for family gatherings or casual entertaining. Plus, it minimizes cleanup – fewer dishes mean more time to enjoy your creation! A skillet also keeps the dessert warm for longer, allowing you to savor each spoonful of gooey chocolate and melted M&M goodness. The presentation itself is a showstopper, especially when topped with a scoop of melting ice cream directly in the warm pan. It transforms a simple dessert into an experience, elevating it to restaurant-quality status right in your home kitchen. For these reasons and more, the skillet brookie is not just a recipe, but a smart choice for any dessert enthusiast.
Essential Ingredients for Your M&M Skillet Brookie
Crafting the perfect M&M Skillet Brookie starts with understanding the role each ingredient plays. While the list might seem extensive as we’re preparing two distinct batters, each component is crucial for achieving that harmonious balance of flavor and texture. Here’s a closer look at what you’ll need and why:
- All-Purpose Flour: The foundational element for both the brownie and cookie layers, providing structure. For a gluten-free alternative, a 1:1 gluten-free all-purpose flour blend can be used, ensuring you check for specific recommendations for baking.
- Granulated Sugar & Light Brown Sugar: This dynamic duo sweetens our dessert while contributing to its tender and moist texture. Granulated sugar offers crispness, while brown sugar adds moisture, depth, and a subtle caramel note, making the brookie irresistibly soft.
- Large Eggs: Essential for binding the ingredients, providing structure, and enriching the flavor of both the cookie dough and brownie batter. Using eggs at room temperature is key for better emulsification with other ingredients, leading to a smoother batter and a more uniform bake. We also include an extra egg yolk in each for added richness and chewiness.
- Unsalted Butter: Butter is the heart of flavor and texture in baking. Using unsalted butter allows you to control the total salt content precisely. If you only have salted butter, simply reduce or omit the added sea salt in the recipe. Ensure it’s melted and slightly cooled for proper mixing.
- Baking Soda: This leavening agent is critical for creating a tender crumb and ensuring both the cookie and brownie layers rise properly. Always ensure your baking soda is fresh for optimal results; an old batch can lead to a flat, dense brookie.
- Sea Salt: A pinch of sea salt is more than just a seasoning; it enhances all the other flavors, particularly the chocolate. It helps to balance the sweetness and brings out the deeper notes of cocoa and vanilla.
- Pure Vanilla Extract: A non-negotiable in both cookie and brownie recipes, vanilla extract deepens and rounds out the overall flavor profile. Opt for pure vanilla extract for the best aromatic and taste contribution.
- Chocolate Chips: We use two types for ultimate chocolate bliss! Semi-sweet chocolate chips are folded into the cookie dough, delivering that classic, comforting chocolate chip cookie experience. For the brownie batter, dark chocolate chips are preferred, intensifying the chocolate richness and creating layers of indulgent flavor throughout the brookie.
- Unsweetened Cocoa Powder: The star of our brownie layer, providing that deep, intense chocolate flavor and characteristic color. Use good quality cocoa powder for a superior taste.
- Instant Coffee Powder (Optional): While not mandatory, a small amount of instant coffee powder (or decaf) wonderfully amplifies the chocolate flavor in the brownie batter without making the dessert taste like coffee. It’s a secret ingredient many bakers use to enhance chocolate.
- M&M’s: These colorful, candy-coated chocolates are sprinkled generously on top, adding a delightful crunch, extra chocolatey goodness, and a festive pop of color. Feel free to use holiday-themed M&M’s to match any occasion or simply your favorite colors for a personalized touch.
Crafting Your Easy M&M Skillet Brookie: A Step-by-Step Guide
Making this M&M Skillet Brookie involves preparing two distinct batters before combining them into one magnificent dessert. While it might sound like extra effort, the process is straightforward and incredibly rewarding. Follow these steps for a perfectly baked brookie every time:
Part 1: The Chocolate Chip Cookie Dough
- Prepare Dry Ingredients: In a medium-sized mixing bowl, meticulously sift together the all-purpose flour, baking soda, and sea salt. Sifting helps to aerate the flour and ensures there are no lumps, leading to a smoother dough. Set this bowl aside for later.
- Combine Wet Ingredients: In a separate, larger mixing bowl, cream together the melted and slightly cooled unsalted butter with both the light brown sugar and granulated sugar. Beat them until the mixture is light, fluffy, and smooth. This step incorporates air, contributing to the cookie’s texture.
- Add Eggs and Vanilla: Introduce the large egg and the additional egg yolk to the butter-sugar mixture, one at a time. Beat well after each addition until fully incorporated and the mixture looks even fluffier. Stir in the pure vanilla extract, beating once more to distribute its aromatic flavor throughout.
- Integrate Dry and Wet Mixtures: Gradually add the sifted dry ingredients into the bowl of wet ingredients. Stir gently, just until the flour streaks disappear and a smooth dough forms. Be careful not to overmix at this stage; overmixing can lead to a tough cookie.
- Fold in Chocolate Chips: Finally, gently fold in the semi-sweet chocolate chips. Distribute them evenly throughout the cookie dough, ensuring every bite will have a delightful chocolatey burst.
Part 2: The Decadent Brownie Batter
- Sift Dry Ingredients: In another medium-sized mixing bowl, sift together the all-purpose flour, unsweetened cocoa powder, baking soda, and sea salt. If you’re using instant coffee powder, sift it in here as well. Setting these aside ensures they are evenly combined.
- Cream Wet Ingredients: In a separate medium-sized bowl, cream the melted and slightly cooled unsalted butter with the light brown sugar and granulated sugar until the mixture is smooth and well combined. This is crucial for a fudgy brownie texture.
- Incorporate Eggs and Vanilla: Add the large egg and the extra egg yolk one at a time, beating thoroughly after each addition to ensure full emulsification. Stir in the vanilla extract, beating until it’s completely integrated, enhancing the overall depth of flavor.
- Combine Dry and Wet: Slowly add the sifted dry ingredients into the bowl of wet ingredients. Stir just until they are combined and no dry streaks remain. Again, avoid overmixing, as this can develop the gluten too much, resulting in a less tender brownie.
- Fold in Dark Chocolate Chips: Gently fold in the dark chocolate chips. Ensure they are evenly distributed to provide rich pockets of chocolate throughout the brownie layer.
Part 3: Assembling and Baking Your Skillet Masterpiece
- Prepare for Baking: Preheat your oven to 350°F (175°C). Lightly grease a 6-8 inch cast iron skillet to prevent sticking and ensure easy removal (though serving from the skillet is recommended!).
- Layer the Deliciousness: Using a spoon or a small ice cream scoop, alternately drop dollops of the chocolate chip cookie dough and the brownie batter into the prepared skillet. You can create a checkerboard pattern or simply layer them in a more free-form, abstract manner. Once all the batter is in the skillet, gently press it down and slightly swirl the two batters together with a knife or skewer for a marbled effect, if desired.
- Adorn with M&M’s: Liberally sprinkle your desired amount of M&M’s over the top of the layered batter. The more M&M’s, the more colorful and crunchy your brookie will be!
- Bake to Perfection: Carefully place your skillet brookie into the preheated oven. Bake for approximately 20-25 minutes. The brookie is done when the cookie dough topping is golden brown around the edges, and a toothpick inserted into the center of the brownie portion comes out with moist crumbs, but not wet batter. It’s important to remember that it might seem slightly underdone when you first remove it, but it will continue to set as it cools in the warm skillet. Avoid overbaking, as this can lead to a dry brookie.
- Cool and Indulge: Allow your brookie to cool slightly in the skillet for about 10-15 minutes. This cooling period is vital for the brookie to fully set and achieve its optimal texture. Serve warm, ideally topped with a generous scoop of cold vanilla ice cream and a drizzle of chocolate or caramel sauce for an unforgettable dessert experience!
Tips for the Perfect M&M Skillet Brookie Every Time
Achieving brookie perfection is within reach with these helpful tips:
- Room Temperature Ingredients: Ensure your eggs and butter are at room temperature. This allows them to emulsify better, creating a smoother, more uniform batter and a more consistent texture in the final product.
- Do Not Overmix: Overmixing flour-based batters can lead to excessive gluten development, resulting in a tough, dense brookie. Mix only until ingredients are just combined.
- Accurate Measurements: Baking is a science. Use proper measuring cups and spoons, and for best results, weigh your flour and other dry ingredients with a kitchen scale.
- Don’t Overbake: This is perhaps the most crucial tip for a fudgy brookie. The brookie will continue to cook slightly from residual heat after being removed from the oven. Err on the side of slightly underbaked for a truly gooey center.
- Quality Chocolate: The quality of your chocolate chips and cocoa powder greatly impacts the flavor. Invest in good quality brands for a richer, more satisfying chocolate experience.
- Skillet Size Matters: A 6-8 inch cast iron skillet works best for the specified baking time and thickness. If using a larger skillet, your brookie will be thinner and might bake faster, so adjust baking time accordingly.
- Cooling is Key: Resist the urge to dig in immediately. Allowing the brookie to cool slightly helps it set properly, enhancing its texture and making it easier to serve.
- Custom M&M’s: Don’t just stick to classic M&M’s! Experiment with peanut M&M’s, pretzel M&M’s, or even seasonal varieties for different flavors and colors.
Serving and Storage Suggestions
The M&M Skillet Brookie is best enjoyed warm, right out of the oven. Its gooey, melty interior and crisp edges are truly a delight when fresh. For an ultimate indulgence, serve individual slices or scoops with a generous dollop of:
- Vanilla or chocolate ice cream
- Whipped cream
- A drizzle of warm chocolate fudge or caramel sauce
- Fresh berries (strawberries, raspberries) for a touch of tartness
- A sprinkle of sea salt to enhance the sweetness
For leftovers, if there are any!:
- Storage: Allow the brookie to cool completely in the skillet. Cover the skillet tightly with plastic wrap or aluminum foil, or transfer the brookie slices to an airtight container. Store at room temperature for up to 2-3 days, or in the refrigerator for up to 5 days.
- Reheating: For that fresh-baked experience, reheat individual portions in the microwave for 15-30 seconds, or warm slices in a preheated oven (300°F/150°C) for about 5-10 minutes until gooey again.
Irresistible Flavor Variations to Try
While the M&M Skillet Brookie is a classic in itself, its versatile nature makes it an excellent candidate for creative variations. Feel free to experiment with these ideas to customize your brookie:
- Nutty Delights: Add chopped walnuts, pecans, or almonds to either the cookie dough or brownie batter for an extra layer of crunch and flavor.
- Different Chocolates: Swap out semi-sweet or dark chocolate chips for white chocolate chips, milk chocolate chunks, or even a mix of different types for varying chocolate intensity.
- Candy Mix-Ins: Instead of or in addition to M&M’s, consider other candy additions like chopped Reese’s Peanut Butter Cups, Snickers pieces, or even mini marshmallows for a s’mores-like twist.
- Swirls of Flavor: Before baking, swirl a tablespoon or two of peanut butter, Nutella, or caramel sauce into the layered batters for a beautiful marbling effect and an extra flavor dimension.
- Spice It Up: A pinch of cinnamon or a tiny dash of cayenne pepper (especially in the brownie layer) can add an interesting warmth and complexity to the chocolate.
- Extract Experiments: Beyond vanilla, try a hint of almond extract in the cookie dough or a touch of peppermint extract in the brownie for a holiday-themed brookie.
Common Questions About This M&M Skillet Brookie Recipe
This dessert earns its name, “brookie,” by being a delightful hybrid of two beloved treats: a rich, fudgy brownie and a chewy, classic chocolate chip cookie. It perfectly combines the best characteristics of both, offering a unique and satisfying experience in every bite.
While “brookie” is the most common and widely recognized term, these hybrid desserts may also sometimes be referred to as “brownie cookies” or “cookie brownies,” clearly indicating their dual nature.
The distinction lies in their base. A blondie is essentially a brownie without cocoa powder, deriving its rich, buttery flavor and lighter color primarily from brown sugar. A brookie, however, is a layered dessert that features a distinct chocolate brownie layer combined with a separate cookie dough layer.
Brookies are incredibly popular because they offer the best of both worlds – the deep, rich, and often fudgy indulgence of a brownie combined with the familiar, comforting chewiness and distinct flavor of a chocolate chip cookie. This creates a complex textural and flavor experience that satisfies different cravings simultaneously, all in one delightful dessert.
Beyond the Brookie: More Skillet Desserts to Love
If this M&M Skillet Brookie has convinced you of the sheer joy and convenience that skillet desserts offer, you’re in for a treat! Skillets are fantastic for creating impressive, yet easy-to-make, warm desserts perfect for any occasion. Their even heat distribution and rustic presentation make them a favorite in many kitchens. Explore more of our delicious skillet dessert recipes that are sure to become new household favorites:
- Peanut Butter Chocolate Chip Skillet Cookie Recipe: A delightful fusion of salty peanut butter and sweet chocolate chips, baked to gooey perfection.
- Salted Caramel Cookie Skillet: Indulge in a sweet and salty masterpiece, featuring a chewy cookie base swirled with rich, buttery salted caramel.
- Chocolate Hazelnut Skillet Brownie: A sophisticated take on a classic, combining deep chocolate with the irresistible nutty flavor of hazelnuts.
- Chocolate Chip Banana Bread Skillet: Comfort food reinvented! Enjoy the moist goodness of banana bread, dotted with chocolate chips, served warm from the skillet.
- Oreo Skillet Cookie: A playful and delicious cookie skillet loaded with crushed Oreo cookies for a cookies ‘n’ cream dream.
Easy M&M Skillet Brookie
Food Dolls
Servings:
16 servings
10 mins
Cook Time:
25 mins
Total Time:
35 mins
Transform your standard brookie into a restaurant-worthy, crowd-pleasing dish with this Easy M&M Skillet Brookie recipe!
Ingredients
Chocolate Chip Cookie Dough:
- 2 cups all-purpose flour
- 1/2 teaspoon baking soda
- 3/4 teaspoon sea salt
- 3/4 cup unsalted butter (melted and slightly cooled)
- 3/4 cup light brown sugar
- 1/2 cup granulated sugar
- 1 large egg (room temperature)
- 1 egg yolk (room temperature)
- 2 teaspoons vanilla extract
- 1 1/2 cups semi-sweet chocolate chips
Brownie Batter:
- 1 3/4 cups all-purpose flour
- 1/2 cup unsweetened cocoa powder
- 1/2 teaspoon baking soda
- Optional: 1/4 teaspoon instant coffee powder
- 3/4 teaspoon sea salt
- 3/4 cup unsalted butter (melted and slightly cooled)
- 3/4 cup light brown sugar
- 1/2 cup granulated sugar
- 1 large egg (room temperature)
- 1 egg yolk (room temperature)
- 2 teaspoons vanilla extract
- 1 cup dark chocolate chips
- M&M’s for topping
Instructions
Chocolate Chip Cookie Dough:
- In a medium-sized bowl, sift the flour, baking soda, and salt. Set aside.
- In a separate medium-sized bowl, cream the melted butter, brown sugar, and granulated sugar until smooth.
- Add the egg and egg yolk one at a time, beating well after each. Add the vanilla extract, and beat again.
- Working slowly, add the dry ingredients to the bowl of wet ingredients, stirring just until smooth. Be careful not to overmix!
- Fold in the semi-sweet chocolate chips.
Brownie Batter:
- In a medium-sized bowl, sift the flour, cocoa powder, baking soda, instant coffee (if using), and salt. Set aside.
- In a separate medium-sized bowl, cream the melted butter, brown sugar, and granulated sugar until smooth.
- Add the egg and egg yolk one at a time, beating well after each. Beat in the vanilla extract.
- Slowly stir the dry ingredients into the bowl of wet ingredients just until combined. Be careful not to overmix!
- Fold in the dark chocolate chips.
For the Skillet Brookie:
- Preheat the oven to 350 degrees Fahrenheit. Grease a 6-8 inch cast iron skillet.
- Add ¼ cup dollops of cookie dough and brownie batter to the skillet in an alternating pattern, pressing down gently. You can swirl slightly for a marbled effect.
- Sprinkle the M&M’s generously on top.
- Bake for 20-25 minutes or until the cookie dough is golden and a toothpick inserted into the center comes out with moist crumbs (not wet batter).
- Cool slightly in the skillet for 10-15 minutes.
- Top with vanilla ice cream and chocolate sauce, if desired. Serve warm!
Equipment
- 4 Medium-Sized Mixing Bowls
- 1 Hand Mixer
- 1 6-8 Inch Cast-Iron Skillet
Nutrition Information
Serving: 1 serving | Calories: 634 kcal | Carbohydrates: 81g | Protein: 7g | Fat: 32g | Saturated Fat: 20g | Polyunsaturated Fat: 1g | Monounsaturated Fat: 7g | Trans Fat: 1g | Cholesterol: 94mg | Sodium: 327mg | Potassium: 284mg | Fiber: 4g | Sugar: 51g | Vitamin A: 633IU | Vitamin C: 0.1mg | Calcium: 96mg | Iron: 3mg
Nutrition information is automatically calculated, so should only be used as an approximation.
Please leave a comment below and share your thoughts!